Warranty
Cerevo’s warranty obligations for this battery (CDP-DM01A-BAT) are limited to the terms set forth herein. Cerevo, as defined below, warrants this Cerevo-branded hardware product against defects in materials and workmanship under normal use for a period of ONE YEAR from the date of retail purchase by the original end-user purchaser (”Warranty Period”). However, this warranty does not apply:
(a) if there is no purchase date, name or signature from the agent on the warranty, or the contents specified on the warranty are altered. The purchase date can be verified by a valid receipt.
(b) to damage during transportation after the purchase.
(c) to damage caused by accident, abuse, misuse, liquid contact, fire, earthquake or other external causes.
(d) to damage caused by connection with other equipment.
(e) to damage caused by operating the product outside the permitted or intended uses described by Cerevo.
(f) to damage caused by service (including repairs and modifications) performed by anyone who is not a representative of Cerevo.
(g) to damage caused by exposing the product outside of the recommended environment.
(h) to failure or damage caused by parts expiration.
(i) if the product is taken apart.
If a hardware defect arises and a valid claim is received within the Warranty Period, at its option and to the extent permitted by law, Cerevo will either:
(1) exchange the product with a product that is new or refurbished that is equivalent to new in performance and reliability and is at least functionally equivalent to the original product.
(2) refund the purchase price of the product.
To the extent permitted by law, this warranty and the remedies set forth above are exclusive and in lieu of all other warranties, remedies and conditions, whether oral, written, statutory, express or implied. As permitted by applicable law, Cerevo specifically disclaims any and all statutory or latent defects.
A replacement product assumes the remaining warranty of the original product or ninety (90) days from the date of replacement, whichever provides longer coverage for you.
When a product is exchanged, any replacement item becomes your property and the replaced item becomes Cerevo’s property. When a refund is given, the product for which the refund is provided must be returned to Cerevo and becomes Cerevo’s property.
Cerevo does not warrant that the operation of the product will be uninterrupted or error-free. Cerevo is not responsible for damage arising from failure to follow instructions relating to the product’s use.
Important: Please do not open or dismantle this hardware. Doing so voids your warranty.
Except as provided in this warranty and to the extent permitted by law, Cerevo is not responsible for direct, special, incidental or consequential damages resulting from any breach of warranty or condition, or under any other legal theory.
If you would like to request warranty service, please contact us.
01. Before use
1-1. For your safety
Hardware precautions
- Dropping the system or using carelessly may cause failure or damage and/or injury.
- If the system becomes unusually hot, stop using immediately and remove the battery.
- Do not transform the system when at an angle of over 45 degrees as shown below.
- Do not touch the terminals of the battery or charger directly.
- If the system, battery or charger are taken apart, warranty and support are void.
- Do not use batteries and chargers supplied by a 3rd party.
- Do not expose the system to water or liquid.
- This item must be stored and used within the main unit guaranteed operating temperature range of 0 to 35 degrees Celsius, humidity of 10 to 90%, and no condensation.
- Check for foreign objects before inserting or removing the battery and before transformation.
- Do not expose the system to high impact shocks.
- Do not operate the system and trigger with excessive force.
- Do not keep the trigger in the pulled position.
- Do not transform the system when holding in any positions other than the recommended one.
- Do not touch the transformation components during transformation.
- Grip sensor may falsely detect if there is a change in temperature or environment.
- Do not use and leave the system near babies and small children.
- Paint may peel with excessive repeated transformation.
- The box packaging is for transportation and storage only. It is not warranted.
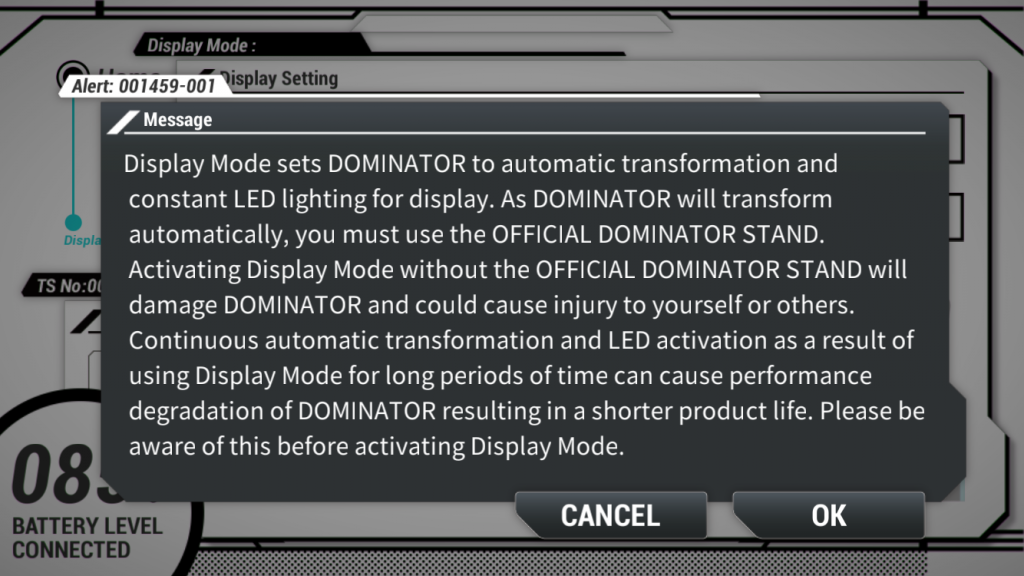
- Display Mode sets DOMINATOR to automatic transformation and constant LED lighting for display. As DOMINATOR will transform automatically, you must use the OFFICIAL DOMINATOR STAND. Activating Display Mode without the OFFICIAL DOMINATOR STAND will damage DOMINATOR and could cause injury to yourself or others. Continuous automatic transformation and LED activation as a result of using Display Mode for long periods of time can cause performance degradation of DOMINATOR resulting in a shorter product life. Please be aware of this before activating Display Mode.
- If you notice any deformation or abnormal heat the battery, stop immediately using and remove the battery from the charger or the main unit. Contact immediately Cerevo Customer Support if you suspect a malfunction.
Other
Note: This equipment has been tested and found to comply with the limits for a Class B digital device, pursuant to part 15 of the FCC Rules. These limits are designed to provide reasonable protection against harmful interference in a residential installation. This equipment generates, uses and can radiate radio frequency energy and, if not installed and used in accordance with the instructions, may cause harmful interference to radio communications. However, there is no guarantee that interference will not occur in a particular installation. If this equipment does cause harmful interference to radio or television reception, which can be determined by turning the equipment off and on, the user is encouraged to try to correct the interference by one or more of the following measures:
- Reorient or relocate the receiving antenna.
- Increase the separation between the equipment and receiver.
- Connect the equipment into an outlet on a circuit different from that to which the receiver is connected.
- Consult the dealer or an experienced radio/TV technician for help.
1-2. Differences between the animation DOMINATOR and this system
- This system can not transform to Destroy Decomposer.
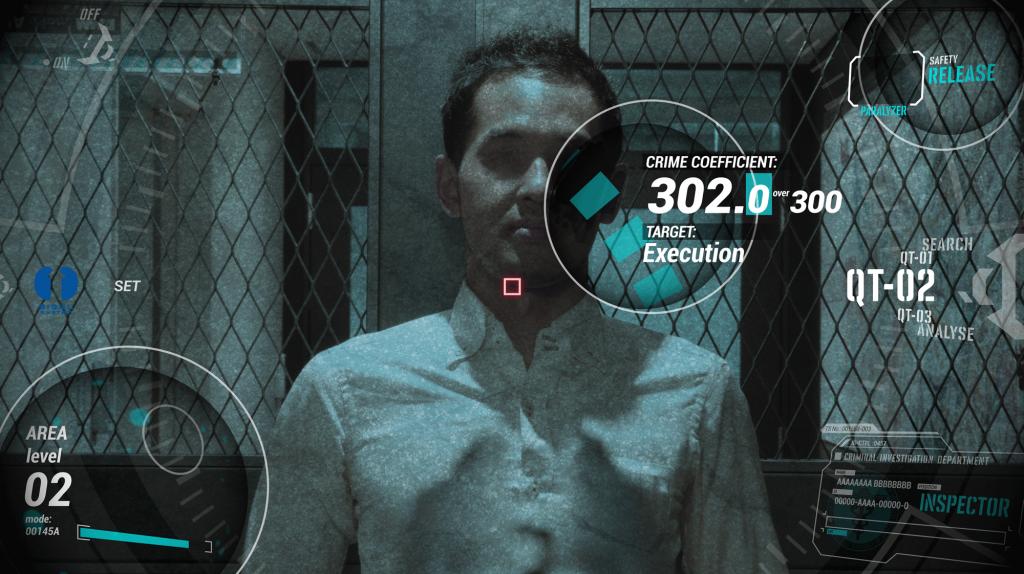
- In PSYCHO-PASS, DOMINATOR voice guidance is played directly to the user so only they can hear the sound. This system uses a regular speaker, therefore the sounds can be heard by anyone near the user.
- The trigger is not physically locked on this system when the Crime Coefficient is under 100 or an unauthorized user is selected. When the trigger is pulled, the system will playback the trigger lock sound.
- In the original story, the user can see information such as crime coefficient values without extra equipment. However, you will have to use the DOMINATOR app to see the data.
1-3 Included items
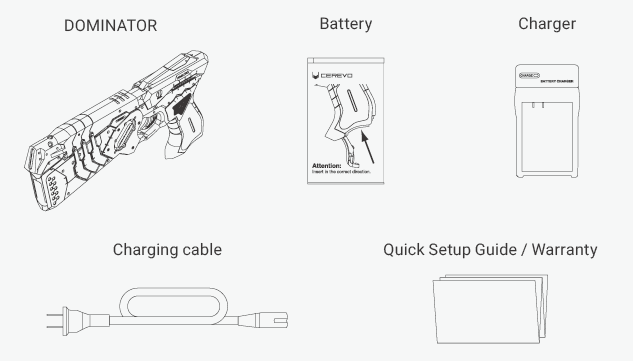
- DOMINATOR
- Battery
- Charger
- Charging cable
- Quick Setup Guide / Warranty
※Please read the Quick Setup Guide before using this system.
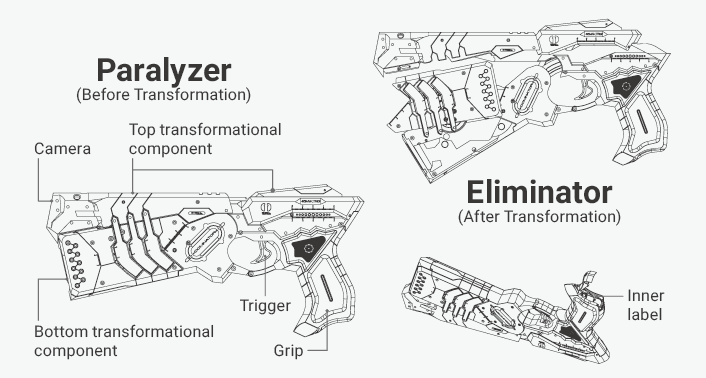
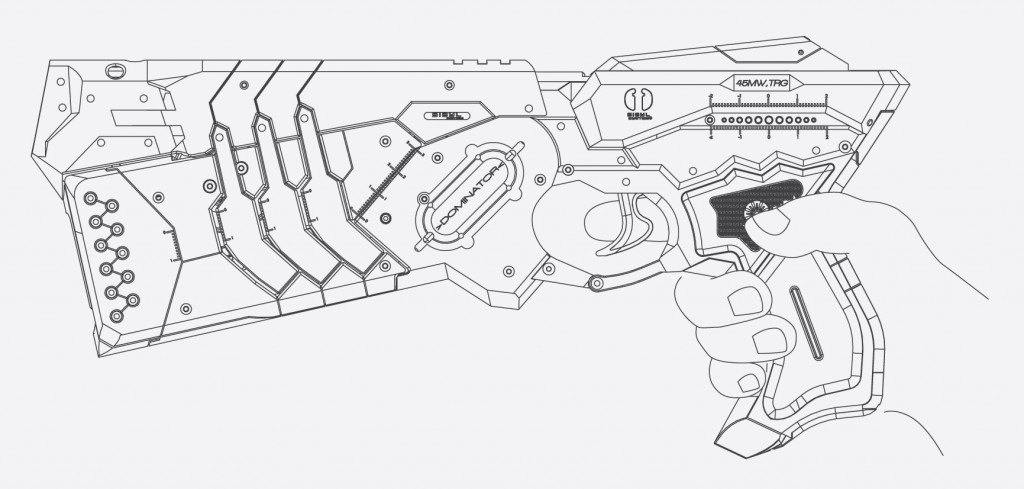
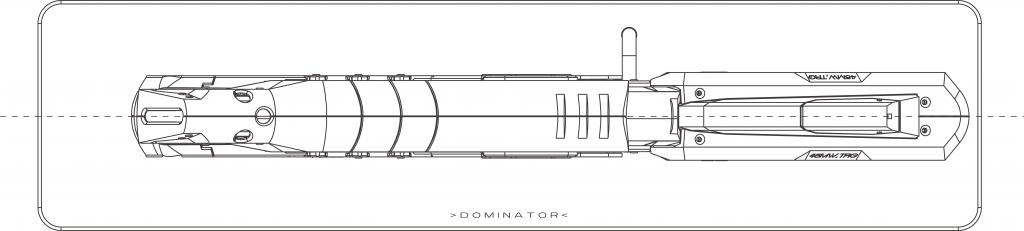
1-4. DOMINATOR diagram
1-5. DOMINATOR Modes
DOMINATOR has 3 modes – Execution Mode, Transform Mode and Display Mode.
Execution Mode
The system will transform and select enforcement mode based on the subject’s Crime Coefficient. Subject images can be taken by the internal camera.
Transform Mode
The system will transform and enforcement mode will be selected without measuring Crime Coefficient.
- ※The system is set to this mode as a factory default.
Display Mode
This mode is for displaying on the OFFICIAL DOMINATOR STAND, the system will transform and activate lighting without being held.
※Continuous automatic transformation and LED activation as a result of using Display Mode for long periods of time can cause performance degradation of DOMINATOR resulting in a shorter product life. Please be aware of this before activating Display Mode.
02. Preparation for use
2-1. Charging the battery
Before using the system, please charge the battery with the included charger. If the LEDs do not light up upon holding the grip, the battery is not charged, please charge with the charger.
How to charge the battery
Before using the system, please charge the battery with the included charger. If the LEDs do not light up upon holding the grip, the battery is not charged, please charge with the charger.
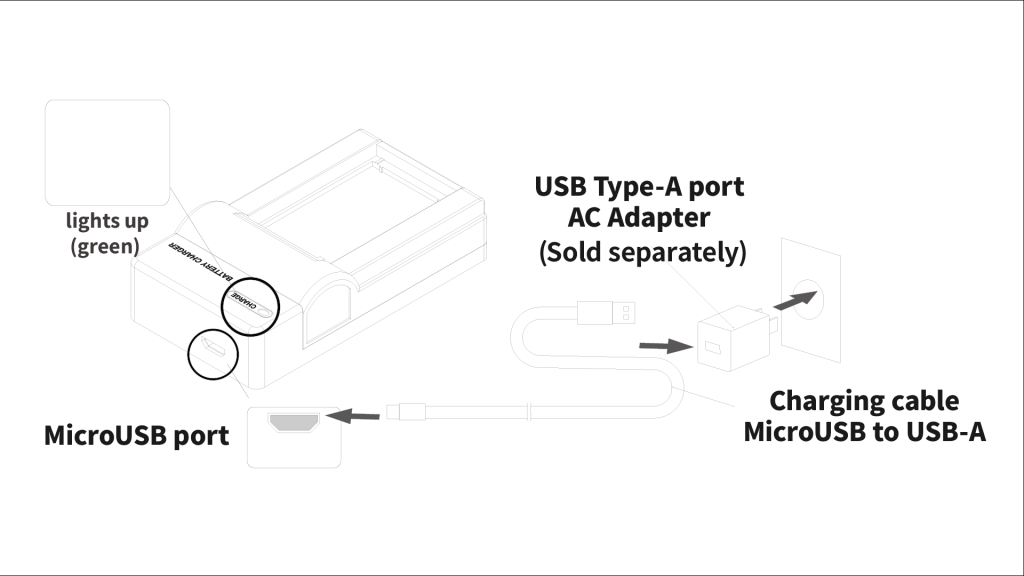
How to charge the battery
- Connect the USB Type-A side of the USB power cable to the USB Type-A port.
*Please prepare the USB Type-A port by yourself. Please use one with a rating of 5V 1A or higher. - Connect the Micro USB end of the USB cable to the Micro USB port on the charger.
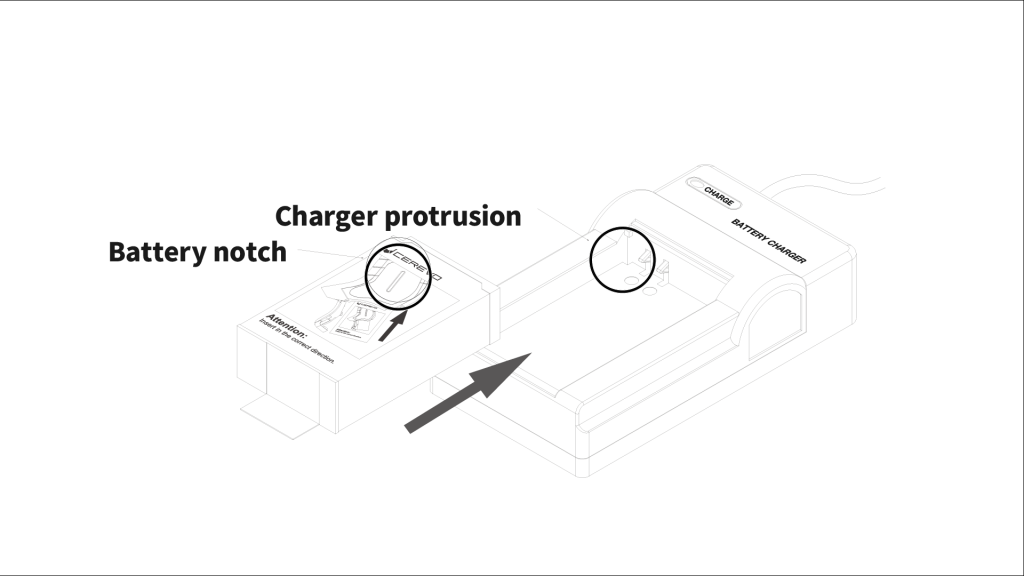
The CHARGE lamp lights up in green to let you know that power is being applied. - Set the DOMINATOR Official Battery into the charger.
Align the protrusion on the charger with the notch on the battery and slide it in the direction of the arrow until it clicks into place.
The CHARGE lamp lights up in red and charging begins.
Charging is complete when the CHARGE lamp lights up in green.
*Immediately disconnect the USB cable and interrupt charging If the CHARGE lamp flashes red and green alternately when an abnormality has occurred such as a short circuit in the charging part. - To remove the battery from the charger, push it in the direction of the arrow and pull it up.
* This online manual applies to DOMINATOR Battery Charger (USB) CTP-DM01A-CHR2 available in 2024.
*Specifications and appearance are subject to change without to improve performance.
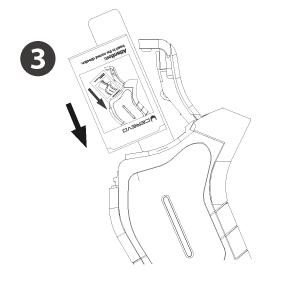
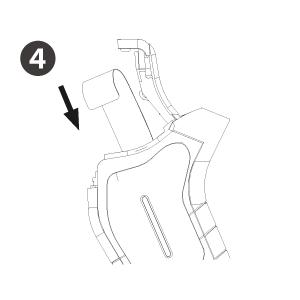
2-2. Inserting the Battery
How to install the battery
Open the grip cover as in the below image.
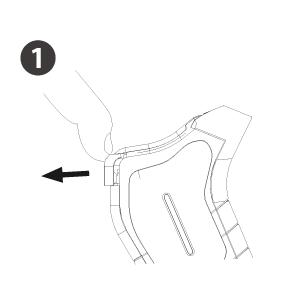
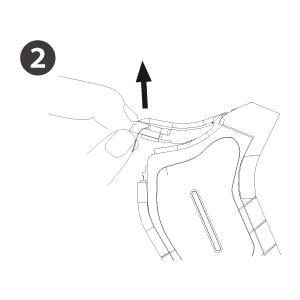
Please insert the battery as in the image.
*Do not to insert the battery while holding the grip. It may cause incorrect operation of the touch sensor.
2-3. Downloading and setting up the app
About the companion app
After connecting to the app, all of the modes and settings can be used. Including Execution Mode, Transform Mode and Display Mode.
For users who don’t have a smartphone, the system is set to “Transform Mode” as the factory default. The system can be transformed to “Paralyzer” and “Eliminator” in this mode by half pulling the trigger. This is described in more detail in the Transform Mode section.
*Once the system’s mode is changed using the companion app, the system will stay in that mode unless changed by the app. Without using the app there are some restrictions with Execution Mode, photos can’t be taken and the preview cannot be displayed.
*The companion app can’t be used without connecting to the system.
Installation and connection settings
Download and install the app onto your iOS/Android* smartphone or tablet. To download the app use the QR code below or go to the following URL –
https://cerevo.com/en/products/dominator/#app
*iOS 8.4.1 or later/Android 4.4 5.0 or later are required.

Select your DOMINATOR’s Wi-Fi “Dominator-XXXXXXXX” in the Wi-Fi settings screen of your smartphone or tablet and input “dominator” as the password.
XXXXXXXX of “Dominator-XXXXXXXX” displayed on your screen Wi-Fi settings screen is your serial number. You can find your serial number on the inner label under the battery compartment cover.
03. App operation
3-1. Companion app guide
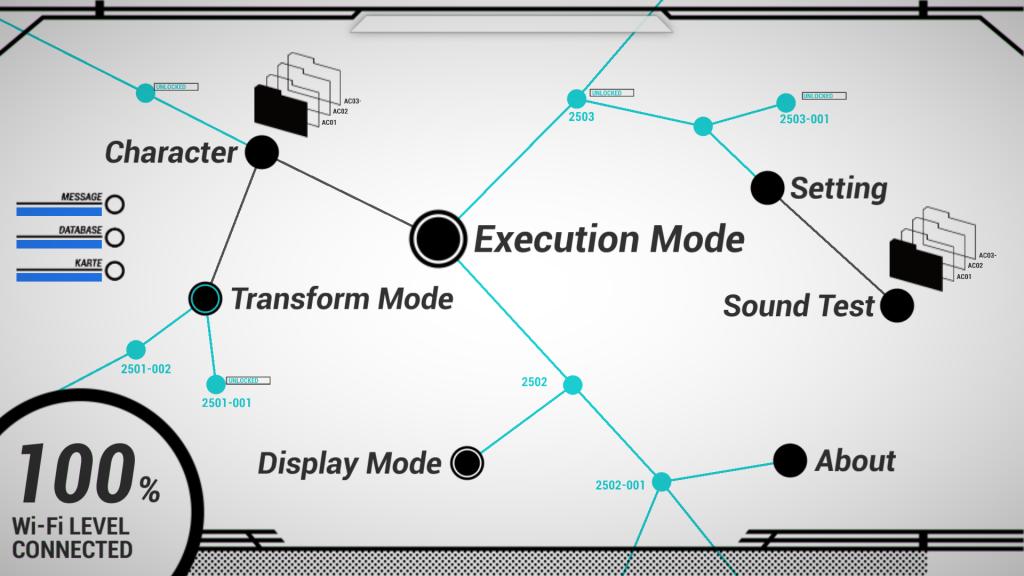
- Character
- Select a character that the system will recognize on startup.
- When an unauthorized user is selected, the DOMINATOR lights up red.
- Transform Mode
- The system will transform and enforcement mode will be selected without measuring Crime Coefficient. The system is set to this mode as a factory default.
- Execution Mode
- The system will transform and select enforcement mode based on the subject’s Crime Coefficient.
- Subject images can be taken by the internal camera.
- Display Mode
- Display Mode sets DOMINATOR to automatic transformation and constant LED lighting for display.As DOMINATOR will transform automatically, you must use the OFFICIAL DOMINATOR STAND.
- Settings
- Change the system settings. (e.g. Volume, LED Luminance, Transform Speed)
- Sound Test
- Test the system voice sound samples.
- About
- Summary of DOMINATOR and staff credits.
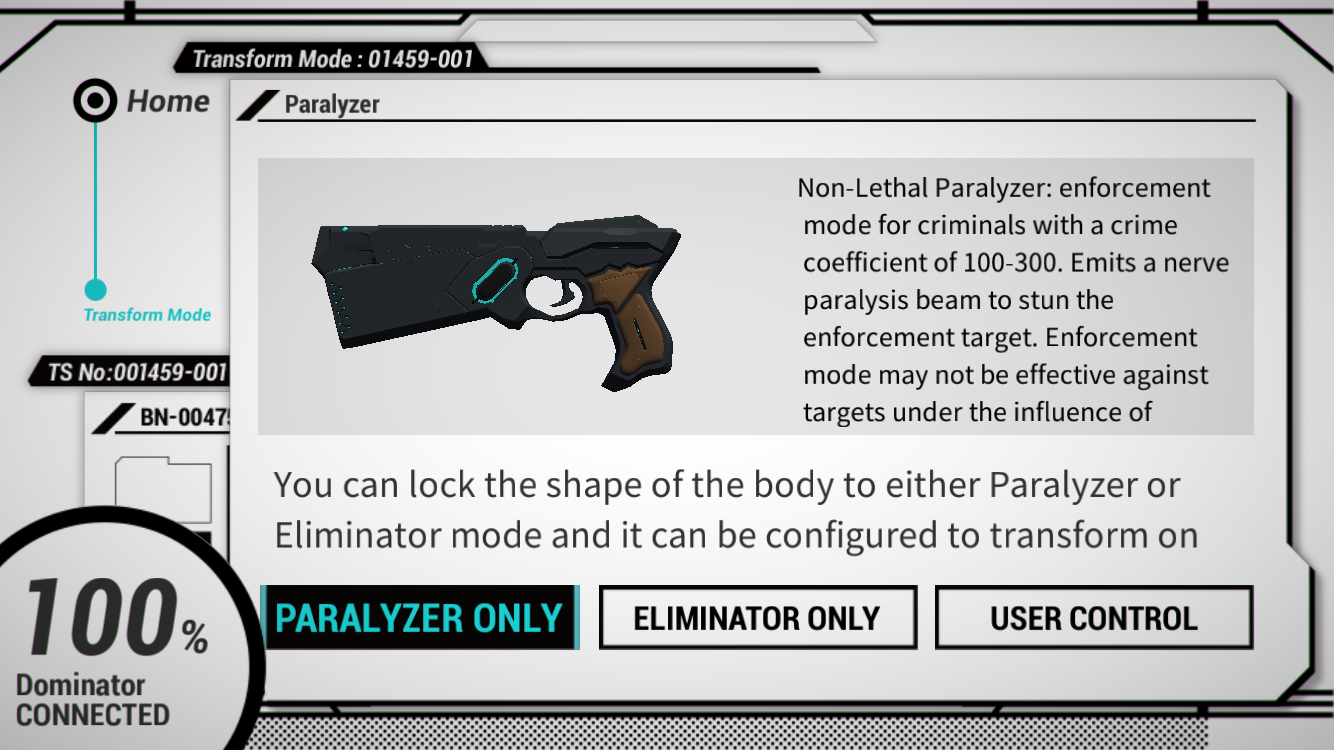
Select Transform Mode in the app.
Select PARALYZER ONLY, ELIMINATOR ONLY or USER CONTROL
- PARALYZER ONLY : The system is fixed to Paralyzer.
- ELIMINATOR ONLY : The system is fixed to Eliminator.
- USER CONTROL : The system transforms into Paralyzer and Eliminator by half pulling the trigger.
After inserting the battery, hold the grip and keep the system horizontal. The system LEDs will light up green and the system voice will play.
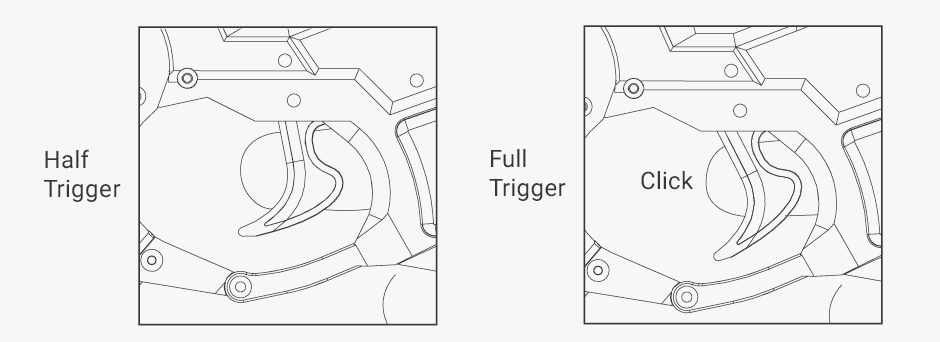
To activate a gunshot sound fully pull the trigger. To play the system voice half pull the trigger, the system will also transform if USER CONTROL has been selected.
*Transform Mode is enabled as a factory default.
3-3. Execution Mode
Select Execution Mode in the app.
After inserting the battery, hold the grip and keep the system horizontal. The system LEDs will light up green and the system voice will play.
Images will be transferred from the internal camera to the app. When the trigger is half pulled, the system will measure the target’s Crime Coefficient. The system will then give audible feedback and transform into Paralyzer or Eliminator depending on the target’s Crime Coefficient.
The enforcement conditions are as follows.
- Crime Coefficient under 100 : The system will transform to Paralyzer and the trigger is locked to disable enforcement.
- Crime Coefficient 100 to 299 : The system will transform to Paralyzer.
- Crime Coefficient 300 or over : The system will transform to Eliminator.
The system will emit a gunshot sound when you fully pull the trigger after measuring the target’s crime coefficient. The system will then return Paralyzer if Eliminator was needed for enforcement of the target. The target’s image with their displayed Crime Coefficient will be saved to your smartphone/tablet.
3-4. Display Mode
You must set DOMINATOR on the OFFICIAL DOMINATOR STAND and select Display Mode in the app.An alert message will be shown, please confirm and then press OK.
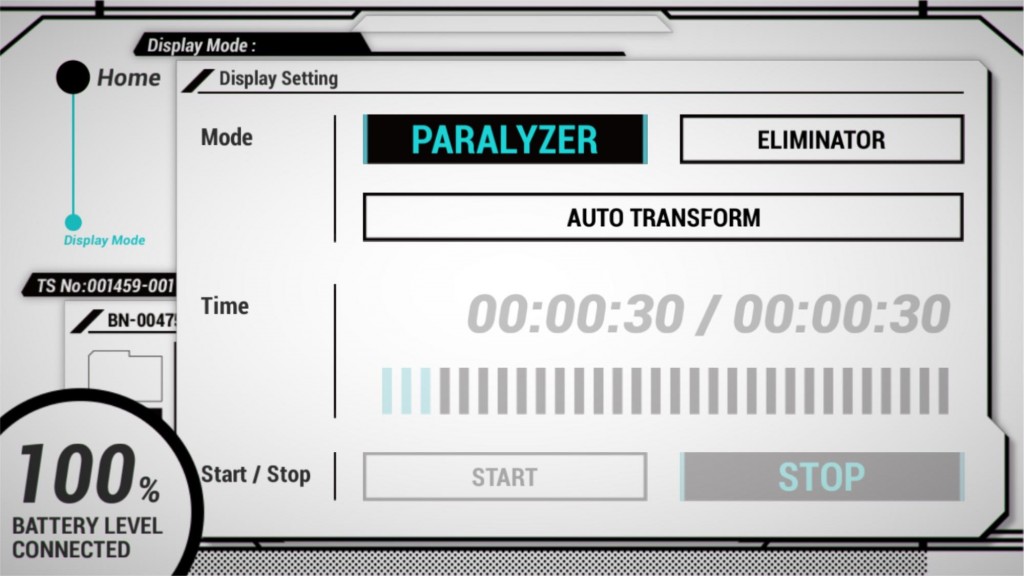
Select either “PARALYZER”, “ELIMINATOR” or “AUTO TRANSFORM”.
- PARALYZER : Fix transformation to Paralyzer with LED lighting.
- ELIMINATOR : Fix transformation to Eliminator with LED lighting.
- AUTO TRANSFORM : Transform between Paralyzer and Eliminator 12 times automatically. Transformation interval is set by time.
※Continuous automatic transformation and LED activation as a result of using Display Mode for long periods of time can cause performance degradation of DOMINATOR resulting in a shorter product life. Please be aware of this before activating Display Mode.
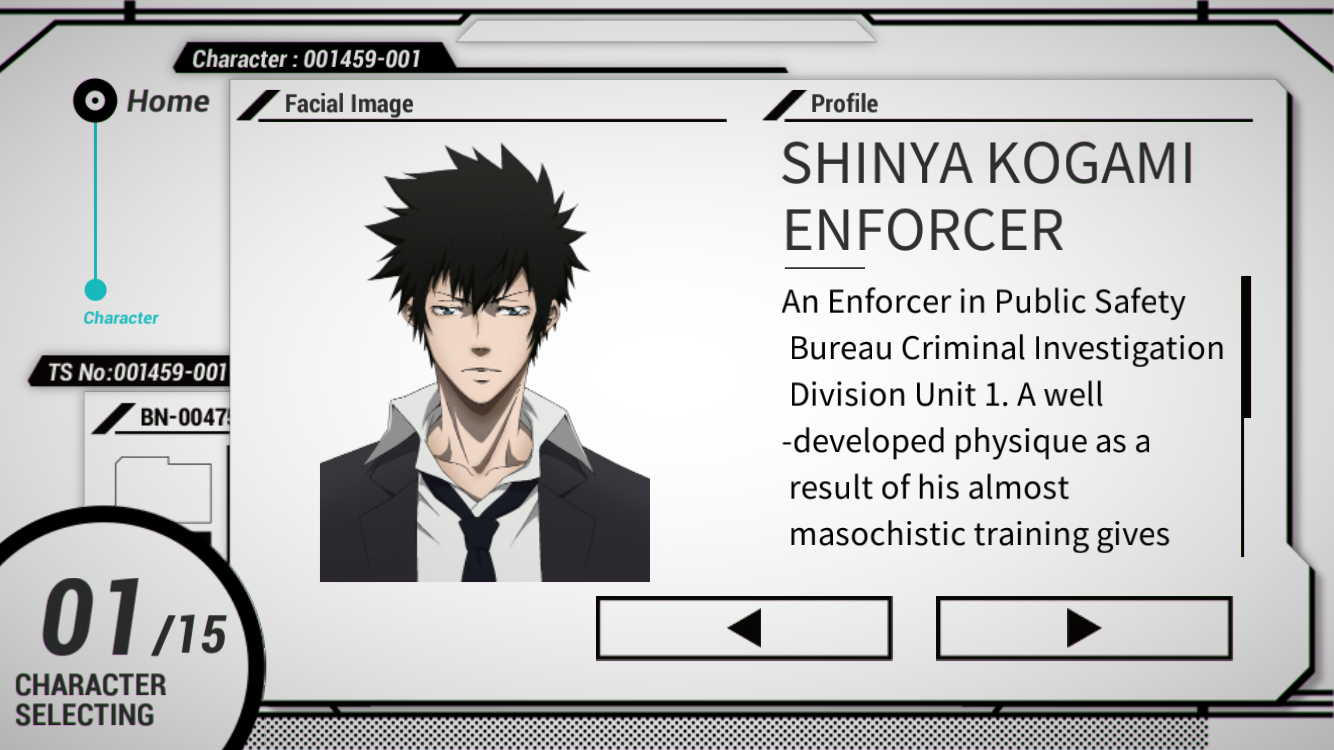
3-5. Character
15 characters from Psycho-Pass can be selected. When an unauthorized character is selected, the system will light up red and the trigger will be locked.
The character descriptions include spoilers to the Psycho-Pass story.
3-6. Sound test
You can test and playback the various system voice sounds. When the play button (triangle) is touched, the selected system voice sound will playback.
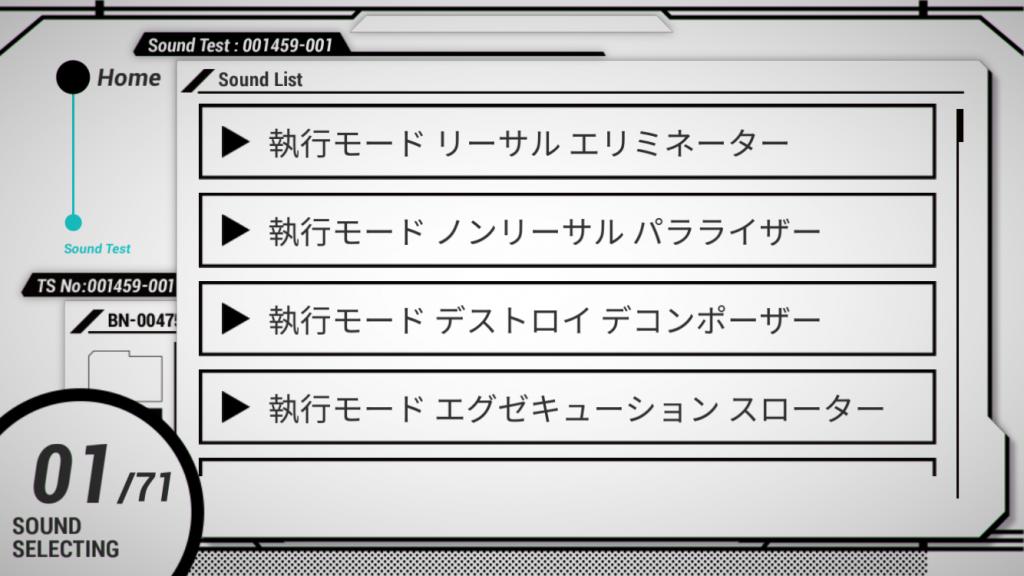
*There are 71 sounds that can be played back in Sound Test.
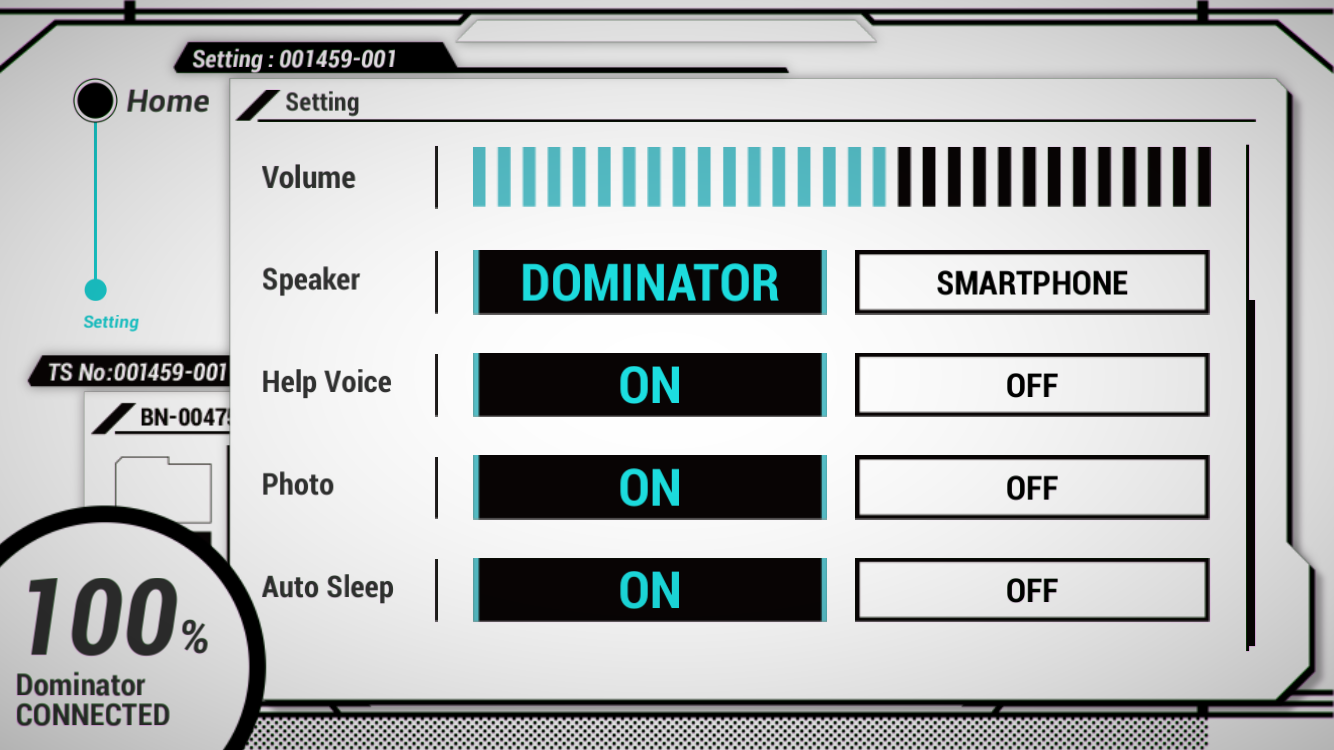
3-7. Settings
Various settings can be configured, changed and adjusted in the settings menu.
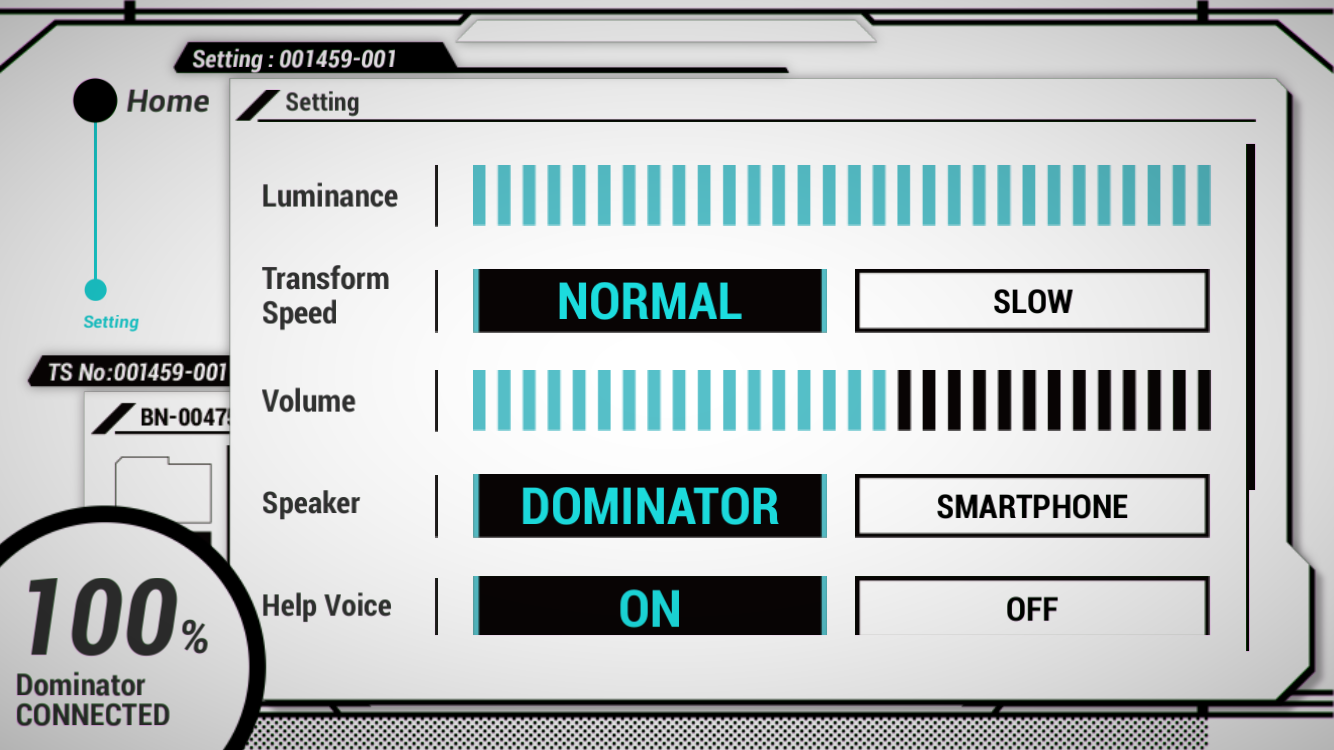
- Luminance : Change the LED brightness between 0 and 30 by touching the level meter.
- Transform Speed : Select NORMAL or SLOW transforming speed.
- Volume : Change the system volume between 0 and 30 by touching the level meter.
- Speaker : Select whether sound is played from the system or smartphone speaker.
- Help Voice : Select ON or OFF to enable or disable the help sound which is played back on entering a mode in the app.
- Photo : Select ON or OFF to enable or disable taking a photo in Execution Mode.
- Auto Sleep : When the grip is released, the LED’s will deactivate but Wi-Fi will remain connected and the system will be in standby mode. The system can be woken up immediately by holding the grip. When Auto sleep is set to ON, the Wi-Fi connection will be turned off 10 minutes after entering standby mode and battery power drain will be reduced. The system will then need a few seconds to wake up after holding the grip.
Factory defaults are as follows.
- Character : Inspector Akane Tsunemori
- Mode : Transform Mode – USER CONTROL
- Settings – Luminance : MAX
- Settings – Transform Speed : NORMAL
- Settings – Volume : MAX
- Settings – Speaker : DOMINATOR
3-8. About
Outline of DOMINATOR, app version, staff credits and third party plugins are displayed.

04. Display stand
4-1. Included items
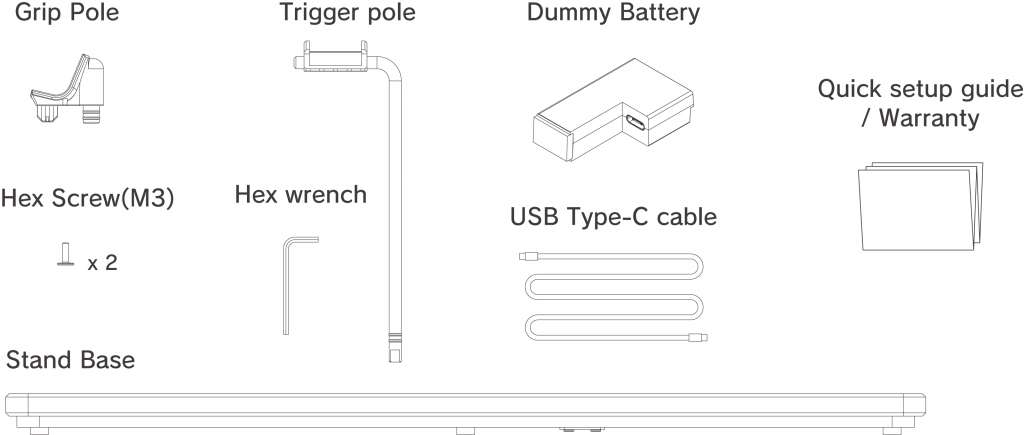
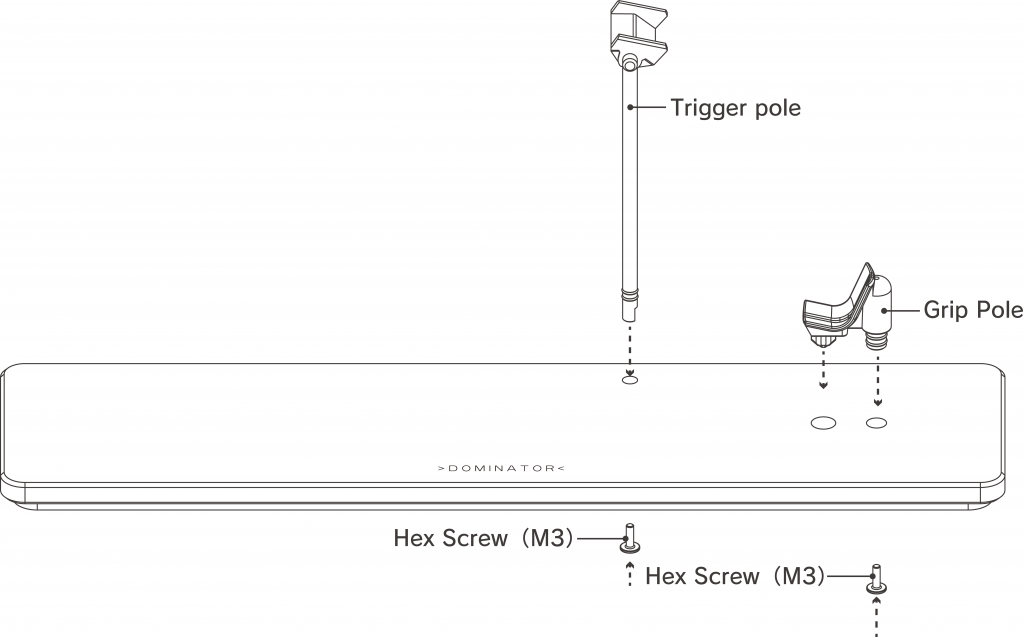
- Grip pole
- Trigger pole
- Hex Screw(M3)
- Hex wrench
- Display stand base
- Dummy battery
- USB Type-C cable
- Quick setup guide / Warranty
4-2. How to assemble
1. Attach each pole to the stand base.
Insert each pole into the hole in the display stand base.
Slowly tighten the screws from the bottom to secure it in place.
Use the included hex wrench to secure the hex screws.
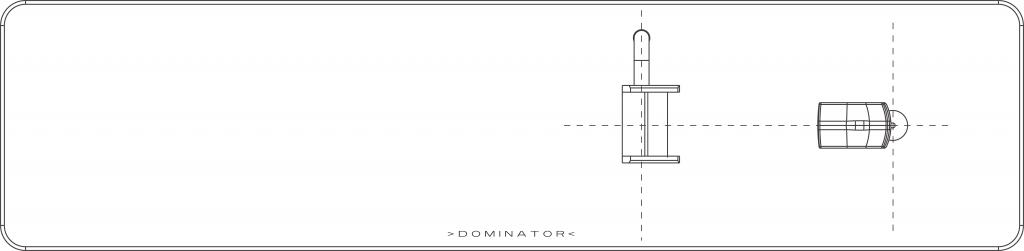
2. Adjust the mounting angle.
Check that each pole is fixed perpendicular to the stand base when viewed from above.
*If the poles are not fixed perpendicularly or the screws are not tightened properly, the DOMINATOR may fall down.
4-3. Placing DOMINATOR
1. Install the dummy battery.
Install the included USB Type-C cable to the dummy battery and insert the dummy battery in the same way as the battery included with the device.
Remove the rubber cap and expose the dummy battery cable.
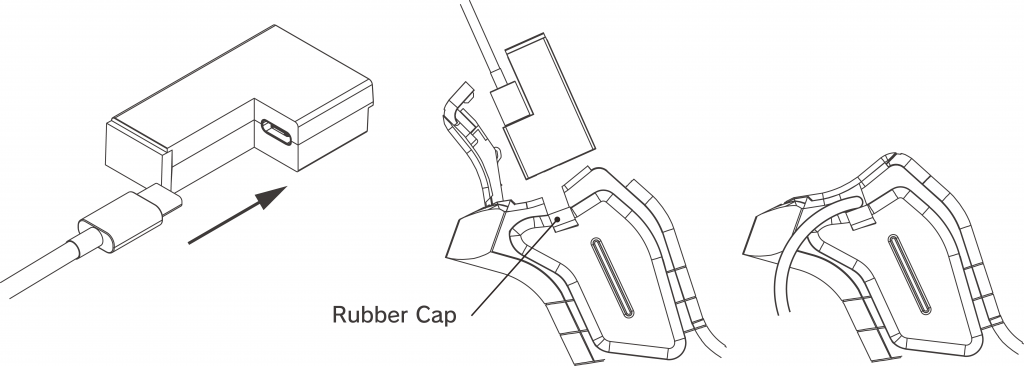
2. Place DOMINATOR on the stand.
As shown in the diagram below, place the step of the trigger part of the DOMINATOR on top of the trigger pole.
Rotate the top of the trigger pole and secure it so that the grip rests on the grip pole.
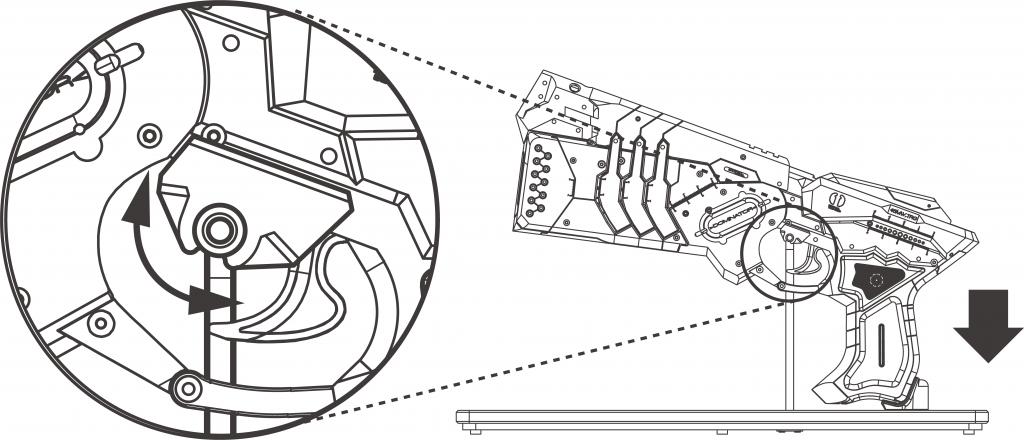
Make sure:
- The DOMINATOR is parallel to the stand.
- Placed in the center of the anti-slip rubber on each pole.
* If not placed correctly, the DOMINATOR may may fall down.
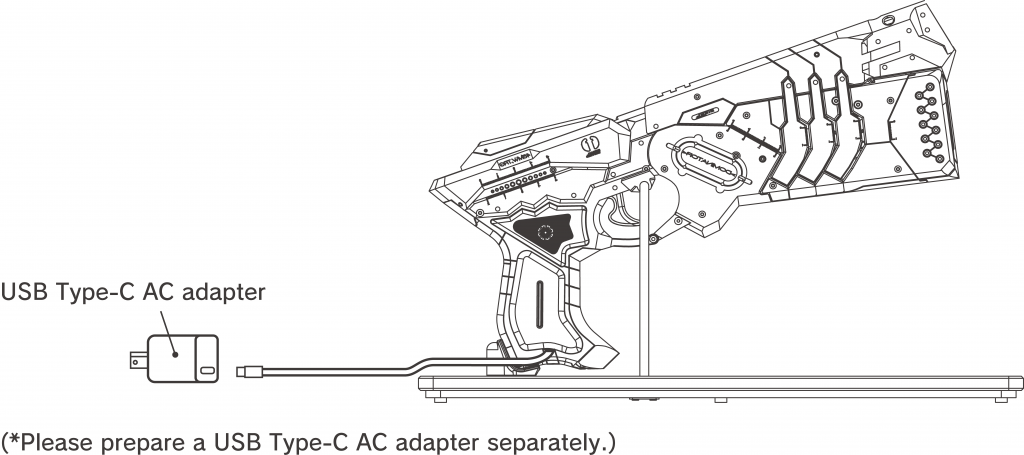
3. Connect the power cable.
Connect the dummy battery USB Type-C cable to the USB Type-C AC adapter.
Set DOMINATOR to display mode, and plug it into a power outlet and DOMINATOR will boot automatically.
4-4. Power Supply
This product requires a power supply that operates via USB Type-C.
As a power supply, you can use a commercially available AC adapter that meets all of the following requirements.
- The power output connector must be USB Type-C
- Capable supplying current up to 3.0 amps at 9 volts DC
- Compliant with USB Power Delivery standard
It cannot be used if the power supply cannot output 3.0 amps at 9 volts even if even it complies with the USB Power Delivery (USB PD) standard and can supply more than 27 watts.
An AC adapter with multiple output ports, it may not be possible to output 3.0 amps even at 9 volts when multiple output ports are used simultaneously or depending on the type of output port.
Please check and make sure the AC adapter’s instruction manual and the specification before use.
4-5. Compatible AC adapter
- Anker
- Anker 323 Charger (33W)
- Anker Nano II 65W
- AUKEY
- BUFFALO
- ELECOM
- SANWA SUPPLY
- TAMA ELECTRONICS INDUSTRY CORP.


